

Many Windows users are complaining about the memory integrity issue “quoting” that “memory integrity cannot be turned on“, especially with Windows 11 but not limited to it. Either the option of memory integrity is grayed out or users got the error of “Standard hardware security not supported” whenever they click on the option of Device security in Windows defender.
Memory integrity is a Windows default feature that prevents malicious software from accessing high-security processes when your system is compromised with any kind of ransomware or malware attack with the disadvantage of slightly slowing down your pc when memory integrity is turned on.
So, let’s discuss each method to fix Memory Integrity cannot be turned on the issue in Windows 11.
Here is a video tutorial if you would like to watch to fix standard hardware security not supported or page not available issue:
Fix Memory Integrity Cannot be turned On by Enabling Virtualization Based Security
If Virtualization based security is not available in your system, then you cannot turn on the memory integrity option in device security and you always got the error Memory integrity page not available whenever you click on device security. So to enable Virtualization based security, right-click on the start menu and choose the option “Run” to open run command in your system.
Now in the Run command type “Gpedit.msc” without commas and hit enter.
Now the windows of group policy will be opened. You need to locate the path: “Computer Configuration/Administration template/System/Device guard”
Now in the right pane, you will find the option of “Turn on Virtualization-based security“

Now, double-click on Turn on virtualization-based security to open its settings in new windows.
In the settings menu, you need to check mark the option “Enabled” and then hit Apply and Ok button to turn on virtualization-based security in your PC.
By replacing your system 32 files
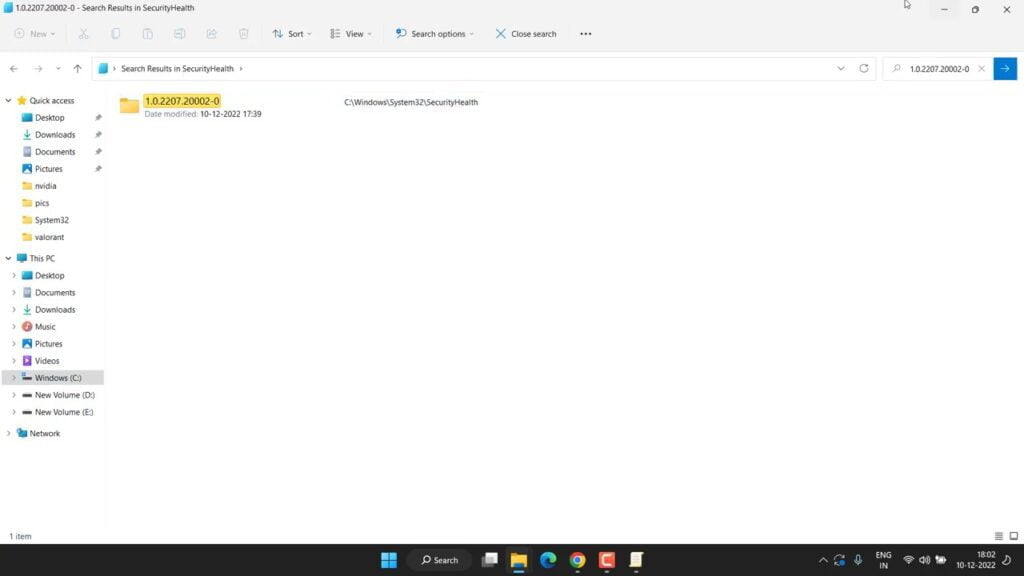
Many users have experienced the issue of memory integrity page not available due to incompatible drivers especially in Windows 11 22H2 just after the update. So in order to fix memory integrity issue locate a path “C:/Windows/System32/SecurityHealth” in your system.
There search for a folder named “1.0.2207..20002-0” by typing the name in the search box
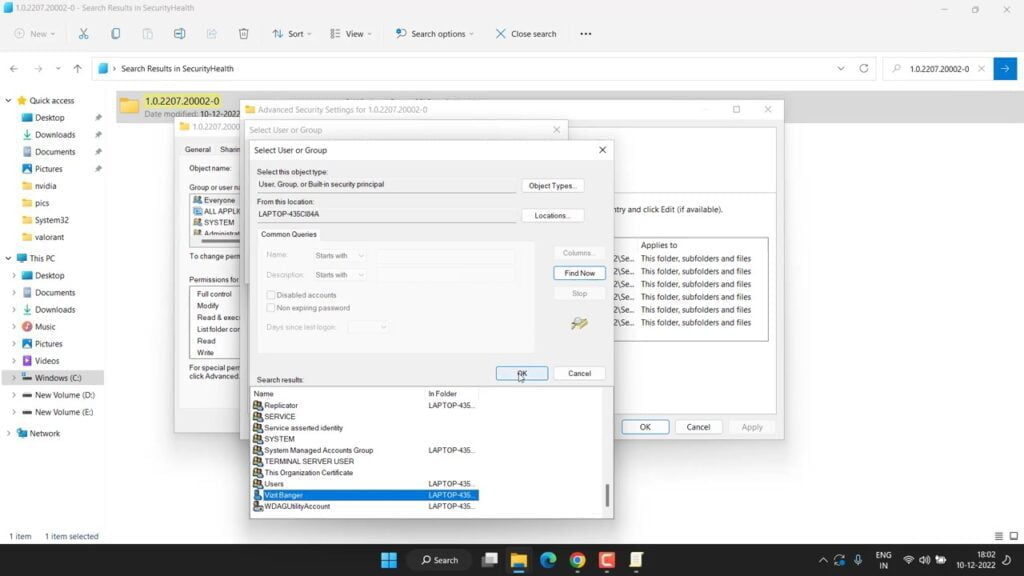
Once you find the folder you need to delete the folder. As the folder is in windows file, you need to take ownership of this folder in order to delete the folder. Right-click on the folder and choose properties. Select the Security tab and choose Advanced options to open the advanced properties of the folder. In the Windows open, next to the owner click on the option “change” and then click on “Advanced Options” and then “find now”
Now find your username in the user list and double click to add the username in the security list and hit the ok button.
This way you have taken ownership of the folder and now you can easily delete the folder. So go ahead and delete the folder to fix out memory integrity issue in device security.
After doing these changes close your C drive and restart your pc and this will fix the issue of memory integrity cannot be turned on in Windows 11.
Fix Incompatible drivers in the Device manager to fix Memory Integrity
If the above method failed to fix and still memory integrity cannot be turned on, we need to fix the incompatible drivers in the device manager. So, right-click on the start menu and choose the option device manager.
Now, in device manager, expand all the drivers present one by one. You need to find “Yellow Exclamatory sign” in the triangle next to the device driver.
If you find one you need to just update that particular driver to fix memory integrity not working issue in Windows 11 22H2.
Fix Memory Integrity Not Available using Registry Editor
Right-click on the start menu and choose the open run.
In run command type “Regedit” without commas and hit the enter key to open registry editor of windows.
In this method, we are going to change the Hypervisor Enforced code integrity.
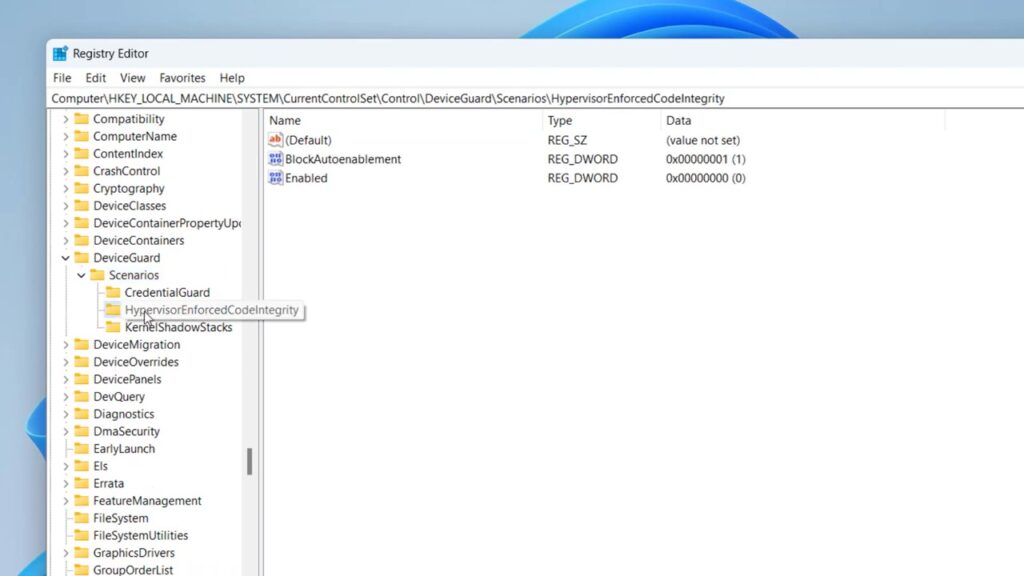
Now, you need to locate a folder in the path “Computer\HKEY_LOCAL_MACHINE\SYSTEM\CurrentControlSet\Control\DeviceGuard\Scenarios” and find a folder with the name “HypervisorEnforcedCodeIntegrity”
If Folder is not available, you can right-click on “Scenarios” and choose the option “New Key” to create new folder and give it a name “hypervisorEnforcedCodeIntegrity”
Now in the right pane, open the “Enabled” file and replace it’s value.
If it’s 1 then replace it with 0 and if it’s 0 replace it with 1. Now for those users who have created a new folder with the name “HypervisorEnforcedCodeIntegrity” in the right pane, right-click and choose the option “New D word (32bit)” and hit enter key to create a new key.
Give it a name “Enabled” double click on the Enabled key choose “Hexadecimal” and give it a value “0” as shown below :

Once done, hit the ok button, close the registry editor and restart your pc to let the changes take place.
This will fix the issue of Memory Integrity Cannot be turned on in Windows 11 22H2 or after the Windows update.
Fix Memory Integrity issue by disabling or deleting the faulty incompatible drivers
If all the methods failed to fix the issue of memory integrity and you are still unable to turn it on let’s disable the problematic drivers with the help of software because no matter how good we are if we do so manually, we will always left something behind.
You need to Download SysInternals software by clicking on this link. Once the software is downloaded, you need to run the program in admin mode.
Right-click on “Autoruns.exe” and choose the option run as administrator to find all the incompatible drivers in your PC.
Now in the interface, click on the driver tab and all the drivers that are not compatible with your system will be shown in the yellow highlighted line as shown below :
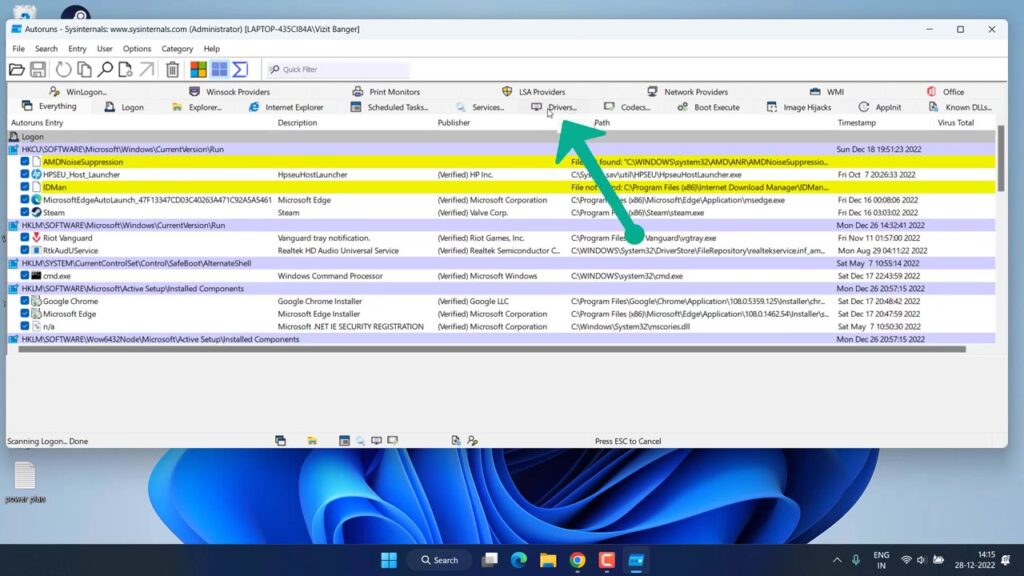
first, uncheck the driver and then try to enable memory integrity. If this doesn’t work then right-click on the incompatible driver and choose the option delete to completely remove the incompatible driver which is causing not to load the standard hardware security not supported error in your system.
After deleting the drivers, don’t forget to restart your pc and this will fix the issue of memory integrity cannot be turned in Windows 11 and your memory integrity toggle button will not be grayed out.
TIP
Sometimes, just enabling the Intel Virtualization technology will fix the issue of memory integrity cannot be turned on in windows 11. So enter into your BIOS mode, and find the option of Virtualization and then just enable the setting to fix memory integrity issue.
After enabling the Virtualization in your BIOS menu, open settings menu choose Apps, and click on Optional features. Scroll down and select the option of “More Windows Features”
Here check mark the option :
- Hyper-V
- Virtual machine Platform
- Windows Hypervisor Platform
then hit the ok button to install these services in windows.
After Doing so, these required files will be installed in your system and then ask you to restart your PC.
After restarting the PC, your issue of Memory Integrity cannot be turned on will be completely fixed.
That’s all folks. This is all you have to do in order to fix Memory Integrity cannot be turned on in Windows 11 after the update.
Let me know in the comments if it doesn’t work out for you so that I can further provide you more support to fix the error “Memory Integrity cannot be turned on” and if you get another way to get rid of this problem do mention so that other viewers also get benefitted from the solution you provided.
Read Next
- Fix Media Creation Tool Error 0x80072f8f 0x20000 during Windows 10 Upgrade
- How to Use PenDrive as RAM in Windows PC – LotusGeek
- How to Disable Microsoft Defender Antivirus – LotusGeek
- How to find the Serial number of any Computer/Laptop
How to fix standard hardware security not supported?
To fix standard hardware security not supported in device security tab of windows security you need to enable the virtualization by entering into the bios menu. It may be under the Security tab or startup or in the configuration tab depending upon the type of motherboard you have. For more details visit the blog.
Fix Memory Integrity Grayed out in Windows 11?
Memory Integrity grayed out generally in Windows 11, especially after Windows 11 22H2 update. So in order to fix simply uninstall the latest updates you have installed by opening “add or remove program” and click on the option “view installed updates” in the left pane. Now in the right pane sort out by clicking on the option “Installed on” and then uninstall by clicking on each update.
Fix Memory Integrity page not available?
Memory Integrity page not available is generally in Windows 11, especially after Windows 11 22H2 update. So in order to fix simply uninstall the latest updates you have installed by opening “add or remove program” and click on the option “view installed updates” in the left pane. Now in the right pane sort out by clicking on the option “Installed on” and then uninstall by clicking on each update.
How to fix memory Integrity Incompatible Drivers issue?
Whenever you tried to toggle on memory integrity you got the error of incompatible drivers. So in order to fix memory integrity, just download the software Sysinternals and run it as admin. Now switch to driver tab and all the problematic drivers will be shown in the yellow highlighted line. Just uncheck the drivers or else right-click and delete the incompatible drivers and this will fix the issue of memory integrity incompatible driver in windows 11 22H2.
