

Microsoft introduces Windows defender antivirus anti-malware solution to prevent your system from unwanted viruses, Ransomware attack, spyware and malwares. Best part of Windows Defender Antivirus is that it doesn’t cost you a penny. This antivirus is provided by Microsoft at totally free of cost in your windows computer.
Even being one of the best antivirus solution, it eats up a a lot of RAM which cause high disk usage. Sometimes Windows Defender may conflict with other programs and unable to run them unless you disable it. There are few software’s that Windows Defender block due to its malicious activity. So, whatever be the reason, sometimes you have to disable the Windows Defender Antivirus temporarily or permanently.
However, Microsoft doesn’t provide any method to disable it permanently unless you work with the registries or use some third party tool.
So, here in this article we will discuss how you can completely turn off your Windows Defender Antivirus in your Windows PC.
#Method 1 : To Disable Disable or Turn off Microsoft Defender for Sometime
Open your Microsoft Windows defender antivirus from the start menu.
Click on “Virus and thread Protection” to open the settings menu of Windows Defender

Now in “Virus and thread Protection” choose or click on “Virus and thread Protection Settings” to open the settings menu of Virus protection

In virus and threat protection settings, Under the “Real time Protection” toggle off the protection.

This method will temporarily disable or turn Microsoft Defender Antivirus.
Now you can go ahead and install any software or program that is conflicting with Windows defender. Once you are done you can again enable it by again toggle it.
#Method 2 – Disable Microsoft Defender Using Group Policy Editor(not for Windows Home Users)
Note : This method doesn’t work for Windows 10 Home users because Group Policy Editor is not available for home users.
Also Watch : Enable Group Policy Editor(Gpedit.msc) in Windows 10 Home Edition
Click on the search box next to start menu and type here “Run” alternatively you can simultaneously press “Windows key + R key” to directly open the run command in your system.
In Run command type “Gpedit.msc” and hit the enter button to open the group policy editor of your system.

Now Locate the following path in Group Policy Editor :
Computer Configuration\Administrative Template\Windows Components\Windows Defender Antivirus
Select “Windows Defender Antivirus” and in the Right pan choose “Turn off Windows Defender Antivirus”

Now double click on “Turn off Microsoft Defender Antivirus” to open it’s properties. Under the properties section, choose the option “Enabled”
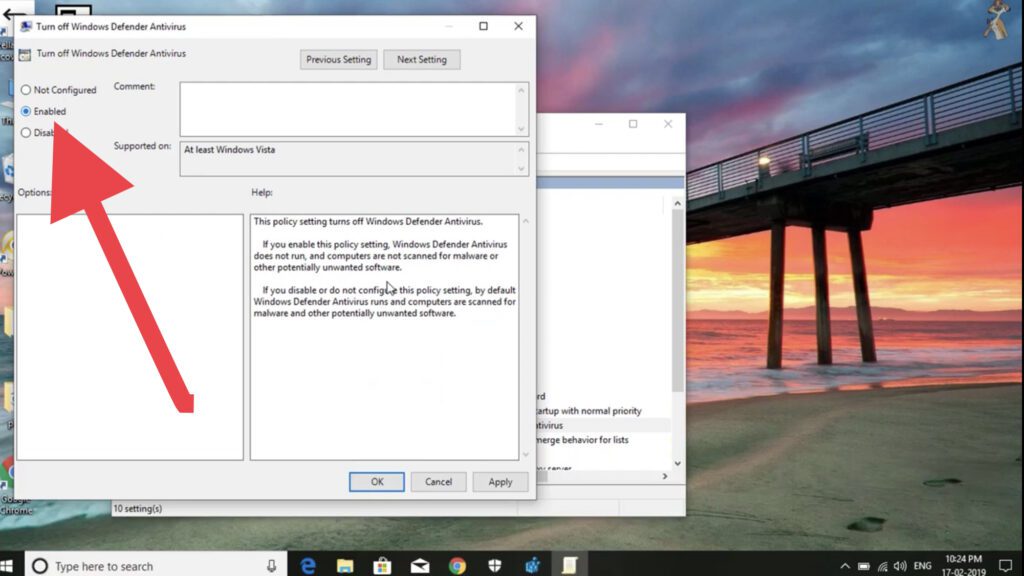
Now hit the Apply button and Ok button to save the settings. Close the Group Policy Editor and Restart your system. This will disable Microsoft Defender Antivirus.
#Method 3 – Disable or Turn off Windows Defender Using Registry Editor :
This step is for Windows 10 home users only because Windows 10 home edition doesn’t have Group Policy Editor Settings.
Open Run command type “Regedit” and hit the enter key to open Registry editor in your system.
In Registry Editor locate the following path : Hkey_Local_Machine\Software\Policies\Microsoft\Windows Defender
In Windows Defender pane, to your right side, right click with the mouse and choose “New” and click on “Dword (32bit) Value” to create a new registry key.

Now give it a name “disableantispyware” and hit the enter key. Now double click on “disableantispyware” to open its properties.

In the properties, Under the value Data tab, give the value as “1” as shown below in the image.
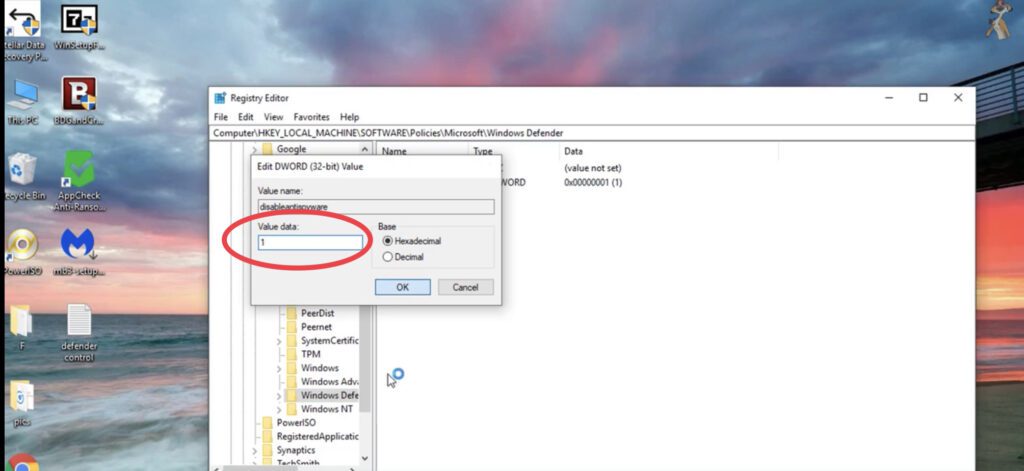
Now hit the ok button and close the registry editor.
Restart your system to disable Microsoft Defender.
#Method 4 – Disable Microsoft Defender Using Third-party Software
In this we are going to Enable or Disable Windows Defender Antivirus with just a single click.
Simply, download a program known as “Defender Control” from the below mentioned link :
Click here to Download

Click on “Defender Control” to download the program.
Save the software in your computer and extract the zip file.
Once the files are extracted double click on Defender Control application to run the application in your system.
Now you are welcome with the following screen with both the options.
1) Enable Microsoft Defender
2) Disable Microsoft Defender

Now depending upon your choice, you can now enable/disable your Microsoft Defender Antivirus with just in a fraction of time.
